 Hailing from Northern California, the burrito has always been a part of my Mexican food vocabulary. As a hungry young gringa in Monterrey, Mexico, I figured its lack of presence on taqueria menus was simply because burritos were so common that their availability was implied. Wrong. I quickly learned that my favorite gut busting treat was not at all a regular (or even a rarity) on any menu in town. So, after living burrito-free for 4 years, I moved to Santa Cruz, California where the burrito climate is significantly warmer.
 Santa Cruz is a town of only 12.53 square land miles with, according to yelp.com, 69 restaurants with the distinction of “taqueria” in their names. It seems anytime a space with a kitchen closes, it’s immediately turned into yet another taqueria. We’ve seen burrito slangers rise in the ashes of fast food joints, soul food spots, pizza places and sushi bars. You’d think with this kind of selection it would be impossible to choose—well, it’s not. They all taste the freakin’ same, and what that tastes like, is BLAND.
Ok… I admit… I only order vegetarian burritos.
“Oh! Well there you have it! Of COURSE she thinks they’re bland,” you say. “If you want a bean and cheese burrito so bad, then go to Taco Bell!”
Now I live in San Francisco. And do you know what also lives in San Francisco?
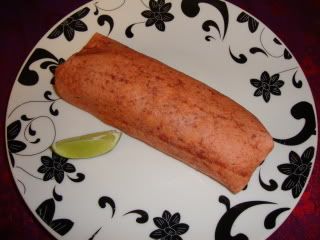
The Mission Style Burrito
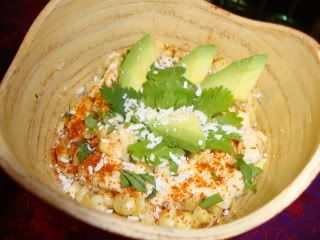
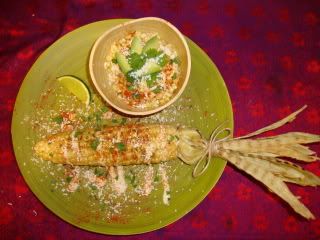
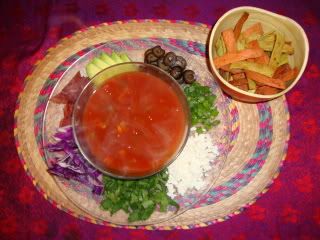
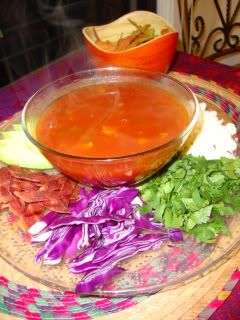
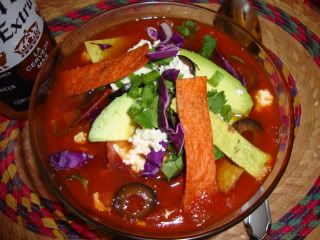
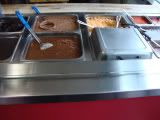
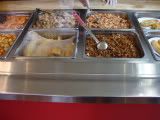
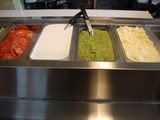
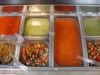
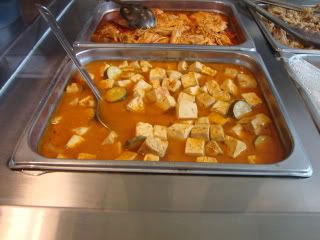
With its origins dating back to the 1960’s, Mission burritos are characterized by the large flour tortilla they are wrapped with as well as the pervasive use of rice within. The large tortilla is first steamed to increase its flexibility and stretch, allowing for more ingredients and resulting in their huge signature size. Sitting behind a shield of glass, ingredients are kept warm in metal serving containers from which the customer can watch them being added to their meal. As an avid lover of buffets and “build your own” anything, I immediately fell in love with the ability to see and pick what goes into my burrito as it moves down the assembly line. Traditionally, a Mission burrito will be stuffed full with rice, beans (black, pinto or refried), any one of a number of meats and salsa (hot or mild). There are a myriad of other ingredients which can be added to compose a “super” burrito, including cheese, avocado or guacamole, sour cream, lettuce, jalapenos, pickled carrots , cilantro and pico de gallo. Most taquerias are also equipped with a well stocked salsa bar.
What really sets these monster burritos apart for a vegetarian is the sheer amount of flavor and options. Since rice is one of the main components of any Mission burrito, it has to be flavorful. None of that boring afterthought orange, grainy stuff you find in SC. This rice is (generally) bursting with taste and often full of veggies like onions, peas and carrots. In fact, when I go to La Coroneta, I’ll always order an additional side of their arroz! Secondly, I have yet to go to a taqueria in San Francisco that does not have a tofu burrito or grilled veggie burrito option. Most also have several fish and seafood choices. When I say “tofu,” here it is important to note that I am not referring to the microwaved “baked” variety or some slices thrown on the flat top for 8 seconds before getting wrapped up. I honestly got a tear in my eye the first time I saw a large container of tofu simmering in hot sauce and onions right up there on the frontline next to the carnitas and asada. Such respect! My first bite of such a burrito was a revelation—I was immediately reminded of that Campbell’s commercial:
Diner: What’s that taste?!
Chef: It's taste.
Diner: I like the taste of taste!
Chef (nodding): It’s tasty.
Hear, hear!
So now, after much ado, I introduce the finale of
May’s Classh Courses.
The HomeOde to Mission Burritos:
Classhy Spanish Rice, Burritofu &
Burrito Building Basics
One day while craving a make-your-own-burrito night at home I realized that not only was I out of tomato paste, but I was also time and therefore unable to run to the store to pick up a little San Francisco Treat- Spansh rice flavor. Scrambling before the homies and Tecate arrived, I began rummaging through my cupboards to find something to improvise with. Just as I was about to resort to serving up a garlic and chicken stock rice, my eyes hit a can of vegetable and rotini Progresso soup. The wheels started turning and Classhy Spanish Rice was born!
Serves 2
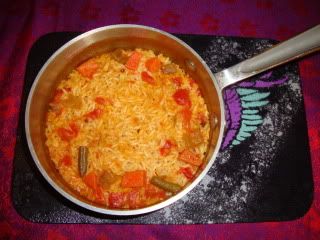 1/2 cup white rice
1/2 cup chicken or veggie stock
1/2 cup tomato based soup
(You mostly want liquid, but also pull some veggies like tomatoes, peas, carrots, peppers or corn)
1 tbsp Smart Balance
1/4 tsp seasoned salt
-Add all ingredients to a small saucepan
-Bring to boil
-Cover, cook on low 20 min
-Fluff with a fork and serve
Burritofu
For 2-3 burritos
1/2 block super firm tofu, in 1/4 inch slices
2 cups veggie broth
1/3 cup tomato paste
2 tbsp SmartBalance
1/2 small to medium yellow onion, sliced
2 large garlic cloves, coarsely chopped
1/2 tsp chili powder (or more!)
1/4 tsp each of salt and pepper
-Saute Veggies in SmartBalance until just lightly browned
-Add Broth, Paste, seasonings and veggies to a pot
-Bring mixture to a boil, stirring frequently to mix well
-Once well mixed, lower heat and simmer covered about 5 minutes
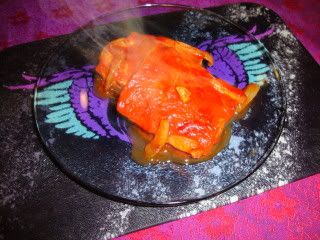 -Place tofu in a baking dish, add tomato mixture and marinade in fridge for 1 hr+
-Preheat oven to 400 degrees F
-Drain excess liquid to same level as tofu tops (mixture can be saved for later cooking)
-Bake uncovered 45 minutes
-Slice tofu into strips for adding to burrito
**I love the texture of well baked super firm tofu! Burritofu could also be prepared in the crockpot- simply mix all the ingredients, add tofu and set to low for, oh... let's say 5 hours :)
Build the perfect Mission Style Burrito!
1. Steam your tortilla by placing your large flour tortilla (mine is sundried tomato!) on a microwave safe plate.
-Spray with butter or a little water
-Cover plate tightly with plastic wrap
-Microwave 30 seconds
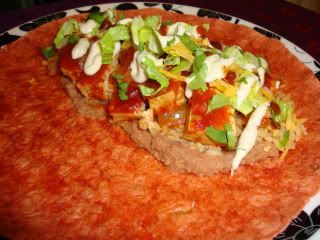 -Beans and rice are first, layed parallel to eachother in a line, slightly off center of the middle of the tortilla
-A generous heaping of meat or burritofu goes next
-Salsa is poured over the protein
-Now come your various "super" choices.
3. Folding can be a bit tricky- start with the plate so that the ingedient piled side of the tortilla is closest to you.
-Fold the sides in at the top and bottom of the ingredients pile.
-While still holding the top and bottom down with your fingers, use your thumbs to pick up the edge of the tortilla closest to you.
-Slowly begin to roll the tortilla up so that the ingredients are essentially rolling onto themselves.
-As you start to lose sight of the ingredients, move your hands so that your pinkie and ring fingers are still controlling the ends while your other fingers and palms are tucking the tortilla over the ingredients and into itself.
-Keep poking those sides in so that you don't get any leakage.
-Don't overfill in any direction and keep the roll tight to insure the perfect burrito!!