Classhy (CLASS-she):
The fusion of classy and trashy; when highbrow ingredients meet lowbrow concepts, and vice versa.

4.29.2010

Classhy Prince n' Pauper T.V. Dinners
Bitchin' Chicken
Part 2- Cooking Challenge
This week is the fourth and final installment of my Prince n’ Pauper T.V. Dinner Classh Courses. It’s been a lot of work and even more fun! So having already covered three of the original T.V. dinners (Turkey Dinner, Meatloaf, Salisbury Steak) I only have Fried Chicken left to work with. Hence, I introduce, Bitchin’ Chicken!

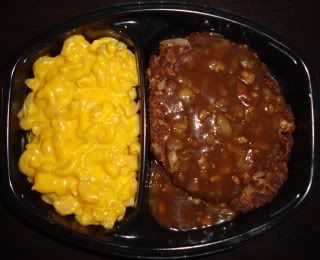
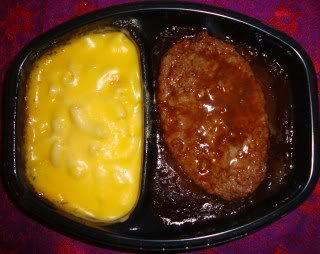
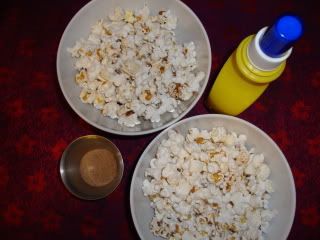
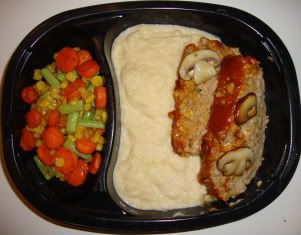
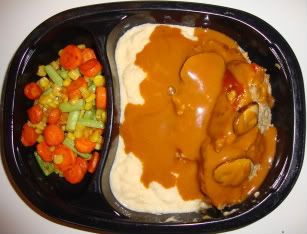
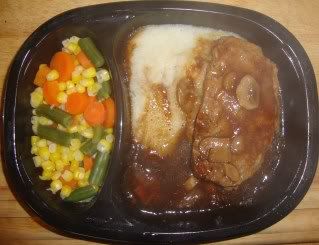
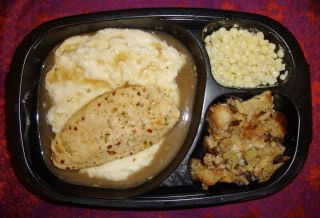
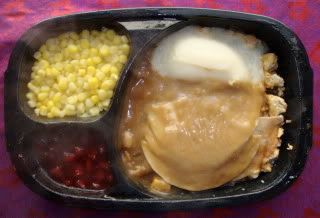
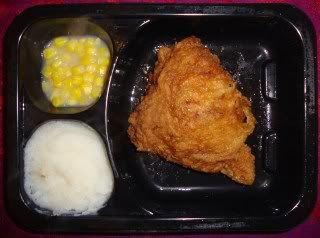
Try as I might, I was unable to find a fried chicken frozen dinner with any sides other than mashed potatoes and corn. But, that made sense considering the entrée, so I went ahead and grabbed the Banquet version of the meal:

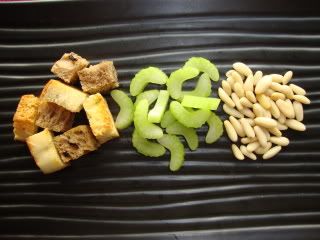
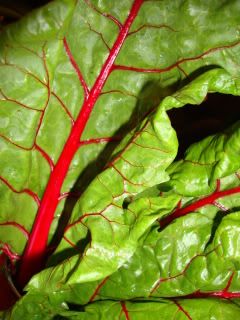
My two additions to the dish were some beautiful purple potatoes and a leaf of Swiss chard (to keep it Southern). I boiled my small potato with its skin still on until it was just cooked through. I then cut it into thin slices and set it aside while I sautéed up my chopped chard.

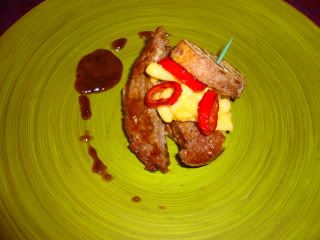
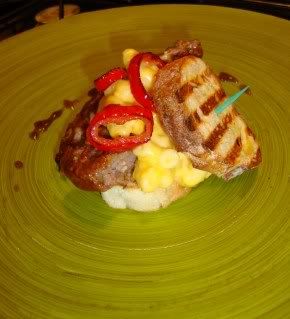
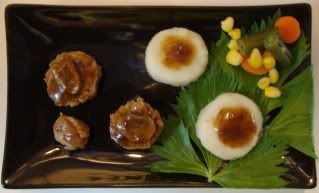
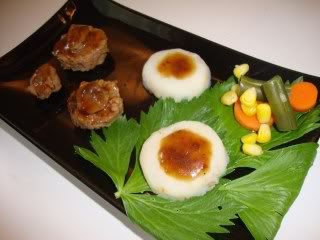
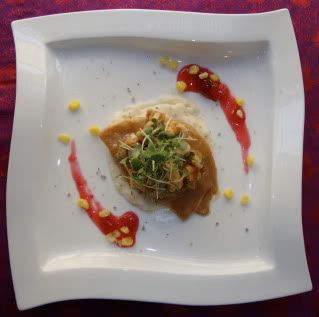
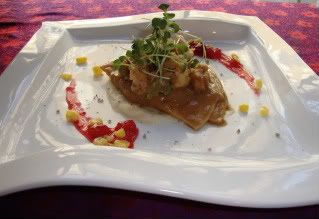
My apartment began to smell like a KFC as the tray heated in the microwave. I let the dish cool significantly before I began dissecting it, since the chicken was piping hot! I first arranged my sliced potatoes in a crescent on my presentation plate. I then stirred up the mashed potatoes—which, for the record, were texturally the oddest, grainiest micro taters I’d seen yet! After placing a dollop of the white spuds on top of the sliced purple ones, I carefully peeled the fried chicken skin off the meat. Being a bit of a squeamish meat eater, I don’t take too kindly to “meat on the bone” and the dark variety definitely creeps me out. So, I sliced a nice chunk of all white meat away from the pesky bone and placed the cutlet atop the mashed potatoes. Taking a spoonful of my cooked chard from the pan, I piled this on top of the chicken and then topped the whole thing with a snipping of crispy fried chicken skin—you know, the best part! Finally, I fished some of the corn from it’s grayish, watery bath and sprinkled them over the purple potatoes. Beautiful!
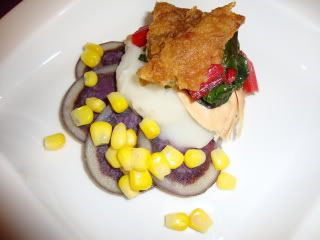
Once again, my choice in additions brought a pop of color to the plate and made the meal infinitely more appetizing. The taste test, however, proved that soggy corn and instant potatoes do no one any favors. My bite of dry chicken, chard and skin, however, was moderately tasty, though I suspect it was the dash of garlic salt in the chard and flavor of the skin doing all the talking there. Once again, I really enjoyed making this composition and look forward to the second part of the challenge!

Stay tuned for Part 2:
Bitchin’ Chicken Cooking Challenge!


4.28.2010

Classhy Prince n' Pauper T.V. Dinners
Sarahsbury Steak
Part 2- Cooking Challenge
This week I appropriately brought the challenge over to my wonderful friend Belinda’s house for our weekly “Trashy T.V. Night.” On the DVR menu for the evening we had the sinfully decadent reality line up of “Addicted,” “Sober House with Dr. Drew,” “Real Housewives of New York,” “Top Chef: Masters” and “Project Runway.” Yeah… we don’t eff around. As far as on our plates, it would be a vegetarian Salisbury Steak and a macaroni cheesy enough to rival our viewing choices


Having little to no frame of reference in regards to making Salisbury Steak, I took to the Interweb in order to do some sleuthing. What I discovered was pretty much as I had expected as far as common ingredients and cooking methods were concerned. Using this knowledge as the basis of my recipe, I formulated a plan of action which spoke more to my own classhy tendencies than simple ground beef n’ mystery sauce. And since that doctor guy got to name the original version after himself, I introduce my version: Sarahsbury Steak!

Serves 2
2 soy based “Griller” style patties
1 packet onion soup/ dip mix
1 small can sliced mushrooms (do not drain)
1/8 small yellow onion chopped
2 tbsp Smart Balance or butter, divided
1 egg slightly beaten
3 tbsp bread crumbs
Salt and pepper
1.5 tbsp white truffle oil
2 tsp cornstarch


-Preheat oven to 300 degrees F
-Make one packet of onion soup per the stovetop directions.
-On microwave safe plate, heat soy patties for 1 minute. Set aside.
-Chop about 6 of the sliced mushrooms. Drain ½ the liquid from the can and set aside. Remaining mushrooms and liquid are unneeded and can be refrigerated.
-Sauté onions and mushrooms in 1 tbsp Smart Balance until onions are lightly browned.
-In a medium mixing bowl, hand shred soy patties and mix in with freshly sautéed veggies, egg, bread crumbs and salt and pepper.
-Form soy mixture into two even oval shaped patties.
-Heat 1 tbsp Smart Balance in a non-stick skillet. Once SB is melted, add truffle oil and swirl pan to mix.
-Immediately add patties and reduce stove to medium heat. Cook for 3-4 minutes, flip and cook additional 3-4 min (or until nicely browned and sticking together).
-Remove patties to oven safe plate and place in warmed oven until sauce is done.
-Top with sauce and serve!

For Sauce:
-Combine ¾ cup onion soup and mushroom juice into patty pan over medium heat. Set aside remaining soup.
-Slowly stir in cornstarch to thicken.

Consider this both a fair warning and an iron clad promise: there will be a significant amount of mac and cheese making going down on this website. I never met a mac I didn’t like and the lengths (or depths) to which I’ll go for my favorite food know no bounds. So while I make some killer mac n’ cheese from scratch, I also love to use a box of Kraft Deluxe, Velveeta Shells and Cheese or Annie’s…well…anything (!) as the base of my mac n’ cheese-coctions. That said, I employed the use of my oldest and dearest friend, Kraft Deluxe, for this week’s side dish, REALitY Cheesy Mac:

1 box Kraft Deluxe Original
1/8 cup Smart Balance
¼ cup crumbled Point Reyes Bleu Cheese
¼ cup fresh grated Romano Cheese

-Bring remaining (3.25 cups) onion soup from Sarahsbury Steak sauce to a boil. Add macaroni, return to boil, reduce heat and cook until tender (about 9 minutes).
-Drain cooked macaroni, add included cheese packet, extra cheeses and Smart Balance.
-Apologize to arteries and enjoy!

After transferring my Sarahsbury Steak and REALitY Cheesy Mac to their respective T.V. tray compartments, I was absolutely taken with how similar my dish looked to the original frozen meal! The scents of truffle oil, onion and creamy cheesiness filling Belinda’s apartment, however, definitely hinted that we were in for much more than a run of the mill Salisbury experience. Sure enough, we tucked into our meal just as we began our recording of “Addicted,” and what a perfect programming choice it was! We both devoured our perfectly cooked flavor soaked steaks and marveled at the ridiculous, over the top, absolutely habit forming cheesy goodness of the macaroni and cheese. I will certainly be recreating this dish in the future as it was definitely not a meal to soon be forgotten!


4.23.2010

Classhy Prince n' Pauper T.V. Dinners
Sarahsbury Steak
Part 1- Plating Challenge

Salisbury steak has always been a sort of mystery to me. It was never a dish served at our family dinner table, nor can I recall having tasted it at either a restaurant or friend’s home. Yet when contemplating the concept of T.V. dinners, Salisbury steak always seems to come right to mind—I suppose marketing really does have an effect! Named after Dr. James Henry Salisbury (1823-1905), an American physician and 19th century nutritionist, Salisbury steak consists of ground beef, minced onions and spices. “Steaks” are cooked in patty form and served with a mushroom, onion or tomato based sauce.


I found that most of the Salisbury steak available in the frozen entrees section of my local CalaFoods now come with a macaroni and cheese side dish, which was great news for me—mac is my favorite!

I used a simple Stouffer’s brand meal for this week’s challenge:


I must mention, after the olfactory torture we were all exposed to last weekend during the MeatLove plating, I am pleased to report that there was no gagging endured during the making of this challenge. ;)
For my two allowed garnishes I chose a red vine sweet mini pepper and grilled cheese baguette. My concept was to create a Salisbury and Mac “sandwich.” I spritzed the bread slices with my lovely spray butter and pressed them in the Panini grill for a spell. I then sliced up the pepper width wise and tossed them with a touch of oil in the sauté pan until they got nice little black edges.

Turning to my main ingredients, I first cut the reconstituted meat into three strips, choosing two of those to layer on top of the bottom piece of grilled bread. After having stirred up the cheese and mac goo, I was able to fish some solid noodles out and pile those on top of the bottom meat layer and bread. Next, I threw three of the pepper rounds on top of the macaroni and angled the top bread slice on with a green toothpick. To finish, I spooned some of the brown mystery sauce around the plate.


This conceptual sandwich has been my favorite of this month’s Prince n’ Pauper plating challenges so far. The simple addition of the red pepper to the color palate made the dish infinitely more appealing and my passion for macaroni and cheese affords me limitless ways to prepare and serve it, so in sandwich form was no exception! The smell of the cooked peppers coupled with the not horrible scents of Salisbury even enticed me to take a bite… or three. This time none of the leftovers went in the trash—steak pieces, leftover mac and extra grilled baguette all went into a Tupperware to be given to one of the ever present homeless people on my way to work downtown.

All around, a very fun experience with great results!


Stay tuned for Part 2
Sarahsbury Steak- Cooking Challenge!

4.22.2010

Happy Earth Day!
Here’s a fun way to put your recycling to use:

Très Frugal Microwave Popcorn Popper

Popcorn is the greatest snack on the planet. As a little girl I can remember sitting on our kitchen counter as my mom air popped white fluffy goodness into a big paper bag. The little dish on top of the noisy 80’s era popper held a pat of butter which melted as the hot air hit it and then got poured over the freshly popped kernels. Some salt, a little sugar and a thorough shaking of the paper bag, she’d pour the contents into a giant mixing bowl and then, I was in heaven.

Pop Stir
Nowadays I remain non discriminatory in my popcorn love—stove popped, microwave, movie theater, store bought, Jiffy Pop, old fashioned stand up popper, Christmas tin, ball park and SmartFood. You name it, I crunch it. If I had to pick a favorite, though, I’d have to turn back to my roots and the comfort of good ole home popped corn from raw kernels. Not having an electric air popper at my disposal, I’ve employed a number of methods to get my fix. There was the classic kernels in a pan method, but it’s very labor intensive and there’s something very grating about dragging a pan back and forth over the stove top. Then one day at Ross I stumbled upon a metal “Pop Stir,” which brought the use of a crank into the stovetop equation, and for a couple years this was a pretty viable solution. The only problems were that the metal would heat up like a motorcycle exhaust, it needed a full cup of kernels to stir and my frequent use caused the plastic stirring wheel to crack, rendering it frustratingly useless. After wearing out THREE of these devices, I was ready for a new solution.

One afternoon I was hoping to make a little snack for my equally popcorn loving bunny, Trickzie. Not wanting to bust out the Pop Stir for a single little handful, I thought to put a few kernels in a small lidded yogurt container that was waiting to be recycled. I snapped the lid back on and put my experiment in the microwave. In my first attempt I saw the lid get popped off and kernels go popping everywhere-- but after a little engineering, I got the concept just right… and the resulting popcorn was perfectly popped! Now that I had bunny sized single serving snacks perfected, it was time to make a people portion popper too!

Here’s how to do it:
1. Wash out a 32oz lidded yogurt or cottage cheese container.

2. With a sharp knife, carefully cut (or if you’re in Santa Cruz, shank) X’s into the lid.


3. Use only as many kernels as will fully cover the bottom of the container… then add a few more for good measure :)


4. Now put the lid back on and stick in the microwave for 2min 30sec. Since microwaves will vary it’s important to pay attention on your container’s maiden poppage. Somewhere between 2 and 2.5 minutes you’ll hit the sweet spot… you’ll know the popcorn is done when it slows to 2 seconds between pops.

5. Take the popper out once it hits it’s sweet spot and note the time for later uses. Keep in mind to always keep one ear on your corn (haha), as you don’t want it to burn. 

(Note: popper will be a bit hot… make sure you have a surface to put it down on quickly.)
Now you have two perfect servings of popcorn-- or, if you’re like me, ONE perfect serving of popcorn!

And now to classhily dress your nekkid corn:

1. Spray a few spritzes of butter spray or a light mist of water from a spray bottle
2. Sprinkle your desired amount of popcorn salt
3. Lightly shake corn, repeat spray and sprinkle cycle until satisfactorily covered.
Enjoy!!

To easily make your own flavored popcorn salts:

1. Choose your favorite dried herb(s) or seasonings
2. Combine with sea salt at about 1:1 ratio
3. Grind into a very fine powder with the use of a mortar and pestle or even an electric grinder (like for coffee)
Voila!

The finer your salt, the better it will stick to your popcorn


Last time I was at the grocery store I saw a great range of seasonings that would be great—BBQ flavored rubs, lemon pepper, chipotle and sundried tomato… get creative!


4.20.2010

Classhy Prince n' Pauper T.V. Dinners
MeatLove
Part 2- Cooking Challenge
 
Everyone has a meatloaf recipe in their family. One of the great things about this American staple is the fact that it can be made with any manner of meats, veggies, spices and even tofu. The single ingredient which is never missing from this classic dish, however, is love. From the uniqueness of each cook’s recipe to the way leftovers are carefully covered in anticipation of tomorrow’s meatloaf sandwich, it seemed only natural to name this challenge after my friend JD’s family’s nickname for the dish: MeatLove.
The spirit set forth by the title truly permeated every aspect of preparing this meal. Natalie and I never looked at a recipe and hit the grocery store armed only with memories of past loaves and a concept of delicious flavors. Without any of my own familiar spices, herbs or sauces at my disposal, Natalie and Justin graciously extended full use of their pantry, herb rack and fridge to me so that Nat and I managed to make it out of Safeway with just $10 worth of ingredients each.

Having taken the fake meat route with my last challenge and already being a veteran Bocaloaf maker, I decided to create this dish with real meat and chose lean turkey as well as white bratwurst (veal). As a kid I always loved bratwurst night and it was probably that meat alone which nurtured my obsession with mustard today. When Natalie informed me that she had a homemade Dijon from Santa Cruz Mountain Brewery, I knew we’d be in for a treat! Keeping with my theme, there was nary a measuring cup or spoon in sight while preparing the following recipe. All of the measurements included are approximations/ guidelines as I do very firmly believe in the addition, omission and substitution of elements based on taste and availability. MeatLove to me is one of those meals that you make with what you have, only purchasing what’s absolutely necessary. I love the way a dish will then evolve and vary from each incarnation!


1.25 lbs lean ground turkey
2 links white bratwurst
¼ cup chopped white onion
2 cloves chopped garlic
2 tbsp butter or Smart Balance
1 cup bread crumbs (we used Italian)
2 eggs lightly beaten
3 tbsp mustard
1 tbsp Worcestershire sauce
A couple shakes of canned parmesan
Tuscan salt, garlic powder, celery salt, pepper
1 packet turkey gravy mix for later

Glaze:
The glaze is very much a labor of love- basically combine your favorite condiments and sesonings (for a total of approx. 1/2 cup) with about 2 tbsp brown sugar. I used a splash of Worcestershire, a squeeze of BBQ, a bunch of yellow mustard and about a teaspoonful of beef stock.


-Preheat oven to 375 degrees F
-Remove casings from bratwurst and hand shred. Set aside.
-On stovetop, sauté onions and garlic in butter until golden.
-Add ground turkey and bratwurst to sauté pan. Lightly brown with garlic/ onion mixture but do not cook through (ab. 4 minutes)
-Move pan contents to mixing bowl and add breadcrumbs, mustard, Worcestershire, parmesan and seasonings.Mix thoroughly.
-Grease a loaf pan while meat cools
-Add eggs to meat, mix thoroughly and transfer to greased loaf pan.
-Top with additional seasonings and a dusting of parmesan
-Cook uncovered 20 minutes
-Add glaze (enough to generously cover the top, but don’t drown it!)
-Cook additional 25 minutes or until meat thermometer reads 165 degrees F
-Let stand 15 min before cutting


Instead of making mashed potatoes again, I opted for a cauliflower mash. As long as you have a food processor or blender, this recipe is a snap to make! Use Smart Balance Light instead of real butter and you’ve also got a healthy alternative to potatoes.
To prepare:
Chop up one large head of cauliflower and put in a microwave safe bowl. Add 1 cup stock (I used beef stock this time) and cover with plastic wrap. Poke a fork through the plastic 3 or 4 times. Microwave 5 minutes, stir, microwave 5 more minutes. Transfer stock and cauliflower to blender, add ½ cup Smart Balance and blend. I used the “liquefy” setting for a smoother mash. Finally stir in ¼ cup of parmesan (fresh or canned) and serve- your mash will already be pretty flavorful, but a little extra salt and pepper to taste never hurt anyone!

My approach to the mixed veggie side was simple yet effective- just like I like it! And with the troops getting restless in the living room I knew it was just a matter of minutes before MeatLove was served. Heating 1 tbsp of Smart Balance in a non stick pan, I threw in my chopped green beans and carrots along with a handful of canned yellow corn. I also added some sliced mushrooms I intended to put on top of the meatloaf. I sprinkled a dash of garlic powder into the mix, then covered and kept a close eye on it ‘til all the veggies were cooked through.


Finally I filled my sectioned T.V. tray with all of the finished elements, topped the MeatLove with the mushrooms then added my simple packet gravy for that special classhy touch!


Nat, Brandon and saraH!
Everyone pretended to be very taken with the presentation, but really I knew they were ravenous and I immediately went about to serve my patient homies. There was just enough for everyone to have seconds and Brandon even had thirds, polishing off any lingering notion of a MeatLove sandwich for breakfast! I was very pleased with the results—the loaf was at once light and decadent in flavor while the mash was hands down the creamiest, yummiest version I’d made to date. The outpouring of support from my wonderful friends really made this challenge a success—heck, we even ate it in front of the T.V.!
Thanks, guys- I love ya!

4.16.2010

Classhy Prince n' Pauper T.V. Dinners
MeatLove
Part 1- Plating Challenge
I headed down to Santa Cruz last weekend in an effort to get some quality time with a bunch of my favorite people. Seeing as I had so much fun sharing my Lurkin' Turk'n challenge with Katie, I thought it would be neat to bring the shown on the road and make a meal my friends and I could all enjoy together. And what better dish to serve to an army of hungry hard working, hard partiers than meatloaf?! So I threw a jar of my trusty herb salt into my weekend bag and hightailed it down on the CalTrain.

After catching up on the latest episodes of “United States of Tara” with my BFF, Natalie, we headed to the local Safeway for supplies. Choosing this week’s frozen dinner proved slightly more complicated as many of the brand options came with the same side dishes from last week. Seriously, there’s only so much mashed potatoes and corn off the cob I’m willing to manipulate here, folks! With that in mind I was able to finally settle on the Marie Callender’s Meatloaf and Gravy- those extra carrots and green beans mixed in with the requisite corn kernels really went far to set Ms. Callender ahead of the pack. Also, I can’t say that I’ve ever indulged in her particular brand of TV dinner, so I was ready to see what she had to offer.

This, apparently, was what she had to offer:


It smelled horrible! Nat’s comment was “Dude, you’re funking up my house!” Meantime her dog, Rudy, was beginning to freak out-- and for good reason—had any other humans (or dogs for that matter) walked into the house they too would have thought someone had forgotten about a can of Purina in the oven. So with that Nat poured each of us a glass of that adorable “Bitch” wine from Whole Foods and I got to the task of making Marie’s slop look presentable.

Having traveled only with said salt from my own cupboards, I had to get creative for my garnish. I ended up tromping through last season’s garden behind the house and choosing some celery leaves to lie on the plate. From there I began forming the mashed potato rounds. This proved to be much easier than it should have been as the “potatoes” were quite doughy. Next I hand cut out each of the meatloaf rounds before peeling off the congealed skin of the gravy (blech!) and glazing the tops of all the rounds with it. Two of my meatloaf bites got mushroom toppers and the third had a slice of onion. Finally I finished the plate with a pile of the mixed veggies in the corner. My result was a whimsical composition which varied significantly from the more classical stacking I had employed last week.

While it certainly looked like a fun and non traditional way to eat meatloaf,the
odors still emanating from the microwave were enough to deter any taste testing from occurring on this particular plating challenge- well, except for Rudy, that is!


Stay tuned for Part 2...
MeatLove Cooking Challenge!

4.06.2010

Cheese, by Any Other Name

Every parent wishes to keep their child safe and protected for as long as possible—to shield them from the harsh realities and often unyielding evil of the world. Once that time comes, when the baby bird inevitably jumps from the nest, the parents hope and dream that their offspring will be equipped with at least enough guidance and knowledge to be able to make informed decisions based on a well balanced upbringing.

Despite my parents’ best efforts, however, my innocence was officially lost at about 6 yrs old. I didn’t see my first R rated movie, start prodigiously reading Stephen King novels or fall prey to some demented predator…no… the fall from naïveté that took place here occurred in the ballroom of the Northern Queen Inn, with a “cheese plate.”

I remember it like it was yesterday… We were at the famed Nevada City hotel for a wedding reception—outside the old wooden water wheel was aglow with an outline of twinkling lights. Inside, the guests swayed under a classic disco ball, myself twirling across the dance floor in a dress my mom had undoubtedly made. At a party which was already sparsely attended by anyone my own age, I didn’t really know any of the other kids. Plus, at one year old, my brother wasn’t much for conversation so I kept myself entertained by dancing about and making frequent trips to the hors d'oeuvres table—a boring party activity combo that continues to come in handy to this day!


It was on one such visit to the buffet that my life was irrevocably changed. My eyes flitted upon what I concluded could only be what the caterers were trying to pass off as a cheese plate. Having up until this point only been exposed to my mother’s rendition of this appetizer staple, I was accustomed to seeing beautifully garnished platters adorned with three dimensional cheese chunks of varying textures and colors. Needless to say, I was more than a little baffled by this black plastic tray before me, covered with uniform (already sliced!) pieces of white and orange cheeses and accompanied by the same kind of meat found in my lunch sandwiches for school. I noticed there was no bread. Weird…maybe someone had eaten it all? But, as a certified cheese fiend, who was I to judge?! I grabbed a slice of cheddar and twirled my way back onto the dance floor.

But wait… What was this!?

This slice of what I had assumed to be cheese was certainly unlike anything I had ever experienced. There was a soft creaminess to the flavor and a texture more akin to slightly dried out play doh than what got chopped off the big block at home. I halted my one girl do-si-do show and made my way out to the patio in order to get a closer look at this new culinary marvel.
My dad happened to be standing out there, chatting with another guest. Smiling, he asked,
    “What have you got there?” I silently held my discovery out to him and he quickly bent down to snatch a bite.
    “Mmmm! Cheese!” he exclaimed. He smiled warmly at me again before turning back to his acquaintance.

Ok, I thought to myself, so this really is cheese. That part I had gotten right. Now it was just a matter of figuring out what kind of cheese it was. I was certainly going to want to remember such things for future reference and fortunately I knew just the person to help with such an important identification.


    “Hey mom?”
    “Oh hi, sweetie. I saw you dancing out there. Are you having fun?” My mom held my brother on her lap and nibbled from a plate of goodies before her, occasionally giving Cory a little taste.
    “What kind of cheese is this?” I had no time for small talk. Although I offered her what I had left of my slice, she barely glanced at it before replying,
    “That’s American cheese.” I couldn’t help but notice she’d made the ID with a certain level of flippancy, as though this American cheese weren’t really cheese- “It’s not really cheese,” she added. I looked at her, perplexed.
    “Well,” she went on, “It’s not made with natural ingredients. There are lots of chemicals and no nutrition in it, that’s why we don’t buy it. And it tastes fake.”


I tossed the remains of my slice in my mouth, spun away and headed straight back to the food table. As far as I was concerned, if that was what fake and nutrition-less tasted like, then sign me up! Throughout the night I continued to grab slice after slice of the chemically goodness between jaunts back to the dance floor.
No longer a solo twirler beneath the disco ball stars, I knew I’d always have a trusty partner, Processed Cheese Product.

4.04.2010

Happy Jesus Zombie Day!!!
Simple Butter Cookies
1 cup butter
3/4 cup sugar
1 egg
1.5 teaspoon vanilla
2.5 cups flour


Preheat oven to 400 degrees.
Cream the butter and sugar. Add egg and vanilla, blending well. Blend in flour
Chill dough for 45 minutes. Roll dough 1/4 inch thick and use cookie cutters to make cookies.
Bake on ungreased cookie sheet for 5 minutes.
Classhy Prince n' Pauper T.V. Dinners
Lurkin' Turk'n
Part 2- Cooking Challenge
For my classed up T.V. dinner version I chose to use soy based meat imitation product. While I am not totally vegetarian (beef jerky, anyone?!), occasional incidents such as the one I'd just had with the gristly turkey meat illustrate why I was a veggie for 11 years and why I now lean heavily toward faux meat consumption. My taster, Katie, is of the same persuasion so I knew we were golden. While I prepared the rest of meal, I left my turk’n soaking in vegetarian turkey gravy.

I had actually never made mashed potatoes or stuffing from scratch before, so I was very excited to do both.

The potatoes were easy. After boiling for 25 minutes in heavily salted water, I smashed up my two organic yukons with a fork. I then added a generous dollop of Smart Balance Light “butter” and a hefty spoonful each of light sour cream and Tofutti vegan cream cheese. I stirred and mashed for a good 10 minutes (I think I might need a food processor…) then sprinkled in a healthy dose of (herbless) garlic salt and onion powder. I topped off the mixture with a few shakes from the parmesan can because, well… it’s what I do. Switching to a whisk I kept the whipping up for another ten minutes. Voila! Fluffy, rich and creamy potatoes.

My stuffing was the part that I was most excited, as well as a touch nervous about. I’m not really one to follow recipes so knowing there was a certain level of structure to the stuffin’ cookin’ process got me to actually bust out the measuring cup for once!

For bread I picked up a rustic cranberry loaf as well as a beautiful rosemary baguette fresh from San Francisco Baking Co. in North Beach.


4 cups cubed bread
2 tbs butter
1/2 cup chopped onion
3/4 cup chopped celery
3/4 cup sliced mushrooms
1/2 cup crushed pine nuts
1 cup veggie broth
1 egg slightly beaten
2-3 chopped garlic cloves
2 tsp dried thyme
few shakes of celery salt
salt n pepa to taste

Preheat oven to 400 and bake cubes 20 min til golden. Place in mixing bowl and reduce oven heat to 350
Melt butter in large pan, add onion, celery and garlic. Sauté for about 13 min, add mushrooms and cook for about 2 min more. Combine veggies with bread.
Add seasonings, broth, egg and pine nuts. Stir well and put mixture in greased casserole dish.
Bake covered 1 hr.

Whole Foods’ organic white corn was the only on the cob corn I could find this early in the season and I picked up a single ear. Generally I do all my corn cooking on the grill, but today I needed to boil it before cutting the kernels off.


A tip for perfectly boiled corn: dissolve about 1.5 tbsp sugar in a full medium pot of warm water. Add corn and bring all to boil together. Boil no longer than 8 minutes.

Finally, I rubbed my awaiting faux turkey in a mixture of sea salt, rosemary, sun dried tomato flake and dried lemon peel. I threw the “bird” in the oven (still at 350o) for about 20 minutes, turning once.

Once everything was all ready, all I had to do was fill up the plastic tray that’d been rinsed of it’s former occupants. I added a smidge of butter and salt to the corn and served.
Katie and I finished the whole plate! I was very happy with the stuffing and immediately regretted not picking up more corn for later- it was delicious!! One element I particularly enjoyed was the potatoes. They looked like just average run of the mill mashed potatoes, but the Tofutti, sour cream and parmesan absolutely took their flavor to such an unexpected place. I will definitely be using and playing with that recipe in the future! All in all, Lurkin’ Turk’n was a success. I got to learn some new tricks and I hope you will be able to use some, too-- Tune in next week for meal two of Prince n’ Pauper T.V. Dinners!

4.02.2010

There is some debate as to by whom and under which circumstances the first T.V. dinner was invented. Some say the frozen turkey meal was retired Swanson executive Gerry Thomas’ solution to a stock freezer full of leftover Thanksgiving turkey meat. Others maintain that the concept of the T.V. Dinner was entirely the brain child of the Swanson Brothers themselves. Either way, “roasted carved turkey breast smothered in gravy with stuffing, whipped potatoes and a side of corn,” was indisputably the first frozen meal mass marketed to the television generation back in ’54. With that in mind, I introduce the first
Classhy Prince n’ Pauper T.V. Dinner:
 Lurkin' Turk’n
For the first part of my challenge, I popped the tray into the microwave and set the timer. As the smell of sodium rich, plastic wrapped food filled my studio, my friend Katie and I were both very curious to see what would emerge from the microwave after those 8 long minutes. Once the timer dinged and the cellophane was pulled back, I was confronted with this as my plating palette:


To start, I carefully separated the mashed potatoes from the mess of stuffing and gravy and then whipped them to a finer consistency. These I spread in a circle in the center of the plate. Next, I used one of my garnish cheats and sprinkled some lavender salt over the potatoes and rest of the plate. I then placed the two top pieces of gravy soaked sliced turkey on top of the potato circle. After fluffing up some of what most closely resembled stuffing, I piled it carefully on top of the turkey. For this particular plate I was definitely going for height, so atop the stuffing I piled micro greens as my last garnish cheat. I stirred up the syrupy sugary cranberry and apple concoction which I then smeared on either side of my turkey pile. To finish, a light dusting of corn kernels!


Katie cracked up when she saw the plate I had created. Of course that got me going and we giggled uncontrollably as we marveled at the ease with which that gnarly looking tray of mush had transformed into a very presentable composition. As our fit of laughter died down, I could tell we were both thinking the same thing… I grabbed two forks and we each created bites that were inclusive of all the dish’s elements. Our eyes met as we chewed. Katie swallowed and set her fork down. I pulled a piece of chewy gristly meat from my mouth. Turkey dinner went in the trash and I started to prep for the real cooking. Looks can be deceiving!


4.01.2010

Hey errrybody! Thanks for stopping by and Happy April Fool's Day-- I hope you all get got good at some point today! It's the first day of Classy but Trashy and I just wanted to remind y'all that there will be constant updates throughout the week. Today's info is a prologue of sorts- so come back often for the good stuff! Also, there are a couple tech glitches I'm working through so please bear with me if we're lookin' a little wonky.
See ya soon :)
Welcome to Classy but Trashy,
a food blog!

Within the pages of this blog you will find essays, stories, recipes and projects that illustrate my life straddling and blurring the not so thin line between gourmet cuisine and low brow chow.

Currently, I am living in San Francisco where I spend my time exploring the rich and delicious foodiverse around me. As a native Northern California girl, I’ve been lucky enough to grow up living and traveling around the world. Through these adventures, my experiences with many international “gourmet moments” have both defined my palate as well as broadened my view on what is considered classy vs trashy not just here at home, but the world over.

I’ve spent my lifetime combining these two seemingly disparate elements in ways that have been unexpected, oddly inspired and often sacrilegious. It is through the content of this blog that I hope to organize and further build on this concept through humor, experimentation and unwavering respect for both ends of the culinary spectrum. Come along as I challenge myself with monthly classhy recipe series, share family foodie anecdotes, muse about my favorite things to eat (including the places to eat them) and generally crack up in the face of culinary convention!

With today’s launch I have included an introduction to each of the sections that make up the content of Classy but Trashy. Over the course of the next week I will be continually updating with the first postings under each of the section titles. Check back often to get an idea of the sort of classhy fun there is in store for the future! After the initial week, expect postings to slow to a more regular pace of 2-3 pieces weekly.

As I am a brand new participant to the blogosphere, it can be guaranteed that there will be changes and schedule tweaks along the way… Please don’t hesitate to give any feedback you think might help—I’m here to learn!